Redmi Note 13 ( Sapphire - Sapphiren ) ANA KONU

Durum
Üzgünüz bu konu cevaplar için kapatılmıştır...

GSMFORUM

Administrator
Yönetici

Note 13 Pro Sapphire ROM Yükleme (Türkçe) ( Edl )

Not : Eng rom atarken Modem seçeneklerini kaldırmanızı öneririm.
Sitemizden Eng ROM’u indirin.
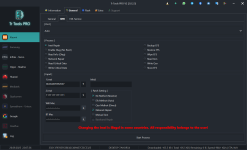
Trtools Pro’yu açın.
Sapphire model bölümüne gidin.
Flash sekmesine geçin.
İndirdiğiniz ZIP dosyasını çıkarın, ardından Trtools Pro’daki dosya seçme simgesine tıklayarak çıkarılan dosyayı seçin.
Cihazı EDL moduna alın.
İşlemi başlatmak için Flash butonuna tıklayın.
İşlemin tamamlanmasını bekleyin.

Note 13 Pro Sapphire ROM Installation (English) ( Edl )


Download the Eng ROM from our website.
Open Trtools Pro.
Go to the Sapphire model section.
Navigate to the Flash tab.
Extract the downloaded ZIP file, then click the file-selection icon in Trtools Pro and choose the extracted file.
Put the device into EDL mode.
Click the Flash button to start the process.
Wait for the procedure to complete.

Note: When flashing the English ROM, it is recommended to deselect the Modem options.
sapphiresecim.png
sapphireengrom.png
sapphiredosyasecim.png
sapphireengromatım.png

sapphiredlengrom.png
 
Son düzenleme:

GSMFORUM

Administrator
Yönetici

Note 13 Sapphire - Qcn Yedeği - Qcn File


Ekli dosyalar

  • Xiaomi-Redmi Note 13 (sapphire) - 864515072895941 - (2025-09-23-00-11-32).zip
    96.1 KB · Görüntüleme: 131
Son düzenleme:

GSMFORUM

Administrator
Yönetici

Note 13 Sapphire Read Critical – Write Critical (Türkçe)


1 – Cihazın Diag Portunu açın veya ENG ROM’u yükleyin.
2 – IMEI bölümüne gidin.
3 – Read Critical düğmesine tıklayın ve dosyanın çekilmesini bekleyin.
4 – Oluşturulan linkin üzerine tıklayın.
5 – Critical dosyasını UDES veya CheckerTR benzeri bir program ile düzenleyin.
6 – Düzenlediğiniz critical dosyasını tekrar cihaza yazdırın.

Note 13 Sapphire Read Critical – Write Critical (English)

1 – Open the device’s Diag Port or install the ENG ROM.
2 – Go to the IMEI section.
3 – Click Read Critical and wait for the file to be extracted.
4 – Click on the generated link.
5 – Edit the critical file using UDES or a similar program such as CheckerTR.
6 – Write the edited critical file back to the device.

readcritical.png
sapphirereadcritical.pngwritecritical.png

 
Son düzenleme:

GSMFORUM

Administrator
Yönetici

Note 13 Sapphire Fastboot Stok ROM (Türkçe)​


Sapphire modelini seçin.
Extra menüsüne gidin.
Stok ROM klasöründeki flash_all.bat adlı dosyayı seçin.
Telefonu Fastboot moduna alın.
Flash butonuna basın.

Note 13 Sapphire Fastboot Stock ROM (English)​


Select the Sapphire model.
Go to the Extra menu.
Choose the flash_all.bat file located in the Stock ROM folder.
Put the phone into Fastboot mode.
Click the Flash button.

fastbootstockrom2.png
sapphirefastbootstockrom1.png
SapphireFastbootstockrom.png
 
Son düzenleme:

GSMFORUM

Administrator
Yönetici

Note 13 Sapphire – QCN Silinmiş – EFS Silinmiş Cihaz Onarımı (Türkçe)


Merhabalar, Note 13 cihazınıza critical dosyayı nasıl yazacağınızı anlatacağım. Lütfen adımları dikkatle takip edin.


Ben işlemi ENG ROM ile gerçekleştirdim, size de önce ENG ROM yüklemenizi öneririm.


1 – Sitemizde bulunan QCN dosyasını telefona yazdırın.
2 – Cihazı Fastboot moduna alın.
3 – Cihazı Fastboot üzerinden okutun.
4 – CPUID yazan değeri not edin.
5 – Ben UDES kullandım, bu yüzden UDES ile anlatıyorum:


  • UDES 1 – Cihaz modelini seçin.
  • UDES 2 – Rastgele IMEI oluşturun.
  • UDES 3 – Not aldığınız CPUID değerini girin.
  • UDES 4 – Onar butonuna basın, inen dosyayı cihaza yazın ve kontrol edin.

Note 13 Sapphire – QCN Deleted – EFS Deleted Device Repair (English)​


Hello, I will explain how to write the critical data to your Note 13 device. Please follow these steps carefully.


I performed the procedure using an ENG ROM, and I recommend that you also flash the ENG ROM first.


1 – Write the QCN file from our website to the phone.
2 – Put the device into Fastboot mode.
3 – Detect the device in Fastboot.
4 – Note down the value shown as CPUID.
5 – I used UDES, so I will explain the process with UDES:


  • UDES 1 – Select the device model.
  • UDES 2 – Generate a random IMEI.
  • UDES 3 – Enter the CPUID value you noted earlier.
  • UDES 4 – Click Repair, then write the downloaded file back to the device and verify.


SapphirewriteQcn.pngislemciid.png

udes2.png
 

GSMFORUM

Administrator
Yönetici

NULL NOTE 13 Sapphire Onarım Yöntemi​

Bu yöntem, şebeke vermeyen Sapphire / Sapphiren cihazlarda %100 denenmiş ve işe yaradığı kanıtlanmıştır.
Lütfen adımları dikkatlice takip edin.

Ön Hazırlık​

Cihaza ENG ROM yükleyin.​

1️⃣ TRTools Pro Fastboot İşlemleri​

Cihazı Fastboot moduna alın.
Fastboot üzerinden CPUID okuyun ve not edin.​

2️⃣ UDES Üzerinden Dosya Hazırlama​

(Ben UDES kullandığım için anlatım bu program üzerinden yapılmıştır.)
Not aldığınız CPUID değerini yazın.
Product kısmından Sapphire modelini seçin.
Rastgele IMEI 1 seçeneğine basın.
Gelen IMEI numarasını not edin.
Kendi IMEI numaranızı ikinci alanına yazın.
Onar tuşuna basın. (Bu işlem sonunda Wi-Fi ve Bluetooth MAC adresleri oluşacaktır.)
Son olarak Oluştur düğmesine tıklayın ve çıkan dosyayı indirin.​

3️⃣ TRTools ile Onarım​

Cihaz hâlâ ENG ROM yüklü halde

Wipe EFS yapın.
UDES’ten aldığınız IMEI 1 değerini ve kendi IMEI’nizi sırasıyla 1 ve 2. alana yazın.
Network Repair işaretli şekilde onarım başlatın. (Cihaz otomatik yeniden başlar, bekleyin.)
UDES’ten indirdiğiniz Critical dosyasını Write Critical bölümünden cihaza yazdırın.
Son olarak Store EFS işlemini gerçekleştirin.​

4️⃣ Kontrol​

Cihaz yeniden açıldığında şebekeyi kontrol edin.
Şebekenin gelmiş olması gerekir.​

NULL NOTE 13 Sapphire Repair Method​

This method has been tested and proven to work 100% on Sapphire / Sapphiren devices that have no network signal.
Please follow the steps carefully.​

Preparation​

Flash the device with ENG ROM.​

1️⃣ TRTools Pro – Fastboot Steps​

Put the device into Fastboot mode.
Read the CPUID from Fastboot and make a note of it.​

2️⃣ Creating the File with UDES​

(The instructions below use UDES because that is the tool I used.)

Enter the CPUID value you noted.
In the Product field, select Sapphire.
Click Random IMEI 1.
Note down the generated IMEI number.
Enter your own IMEI number in the second field.
Click Repair. (This will also generate the Wi-Fi and Bluetooth MAC addresses.)
Finally, click Create and download the generated file.​

3️⃣ Repair with TRTools​

While the device is still running the ENG ROM:

Perform Wipe EFS.
In the IMEI fields, enter the IMEI 1 value from UDES and your own IMEI in the second field.
Start the repair with Network Repair checked. (The device will restart automatically—wait for it.)
From Write Critical, flash the Critical file you downloaded from UDES to the device.
Finally, perform Store EFS.​

4️⃣ Verification​

When the device restarts, check the network.
The signal should now be restored.

sapphire.png
wipeefs.png
udes.png
repair.png
writecritical.png
storeefs.png
 

Ekli dosyalar

  • repair.png
    repair.png
    153.8 KB · Görüntüleme: 6

GSMFORUM

Administrator
Yönetici

NOTE 13 SAPPHIRE — BL LOCK, AUTH'SUZ, CPID'SİZ, DİRENÇSİZ ÇİFT SİM REPAIR

TÜRKÇE REHBER


Sıralama:

1. Cihazı EDL moduna alın.
2. General kısmına gelin.
3. EDL Araçları bölümüne girin.
4. EFS yedeği alın.
5. Tekrar EDL kısmından Patch Device yapın.
6. Cihaz açıldıktan sonra aşağıdaki kod ile DIAG açın:
##73694364*#*#
7. Cihazın QCN dosyasını yedek alın.
8. Cihazı yeniden EDL moduna alın.
9. EDL Araçları'ndan Wipe EFS yapın.
10. Cihazı açın.
11. IMEI bölümüne gelin.
12. IMEI numaralarını yazın.
13. Patch Ayarları kısmından QCN Method seçin.
14. Manual QCN seçeneğini işaretleyin.
15. IMEI Repair işlemini başlatın.


NOT:
Cihaza ENG ROM yüklerseniz yukarıdaki uzun işleme gerek kalmaz.
Doğrudan EFS Auto ile repair yapabilir ve Fastboot araçlarından Fastboot modunda Patch uygulayabilirsiniz.
Son olarak cihazlar çok qcn seciyor. servis yok yazıyorsa qcn deneyin.


NOTE 13 SAPPHIRE — BL LOCK, NO AUTH, NO CPID, NO RESISTOR, DUAL SIM REPAIR

ENGLISH GUIDE


Steps:

1. Put the device into EDL mode.
2. Go to the General section.
3. Open the EDL Tools menu.
4. Take an EFS backup.
5. From EDL again, perform Patch Device.
6. After the device boots, enable DIAG using the code:
##73694364*#*#
7. Backup the device’s QCN file.
8. Put the device back into EDL mode.
9. In EDL Tools, perform Wipe EFS.
10. Boot the device.
11. Go to the IMEI section.
12. Enter the IMEI numbers.
13. In Patch Settings, select QCN Method.
14. Choose the Manual QCN option.
15. Start the IMEI Repair process.


NOTE:
If you flash the device with an ENG ROM, none of the above steps are needed.
You can repair directly using EFS Auto and apply Patch from Fastboot tools in Fastboot mode.
 
Durum
Üzgünüz bu konu cevaplar için kapatılmıştır...
Üst