Redmi 14C / POCO C75 / A3 Pro ( Lake - Pond )

Durum
Üzgünüz bu konu cevaplar için kapatılmıştır...

GSMFORUM

Administrator
Yönetici
Bu cihazda en sık yapılan hata, Critical dosyasını yazarken cihazı kontrol etmemektir.
Eğer Pond olan cihaza Lake Critical yazarsanız Nvdata hatası oluşacaktır.
Cihazı Fastboot moduna alarak Penguen simgesine tıklayın ve cihazın Pond mu yoksa Lake mi olduğunu kontrol edin.

The most common mistake on this device is not checking the device before writing the Critical file.
If you write Lake Critical to a Pond device, it will result in an Nvdata error.
Put the device into Fastboot mode, click the Penguin icon, and check whether the device is Pond or Lake.

fastbootokutma.png
 

GSMFORUM

Administrator
Yönetici

Redmi 14C ( Lake - Pond ) Da Hatası veren cihaz çözümü. (Hyperos 1 Cihazlarda Denendi)


Merhabalar arkadaşlar hatalı işlem yaptığımız zaman Redmi 14C Cihazda DA dosyası seçsekte Da hatası alıyoruz bunun çözümünü veriyorum. Bizzat denenmiştir.​

İşlem yapmadan önce hataları görelim.​


Os 1 DA Hatası​

14chatada1.png

Os 2 DA​

14chatada2.png


Çözüme Geçelim

İşlemleri eksiksiz takip edin; aksi hâlde başa dönersiniz.


  1. Cihazı Recovery moduna alın, ardından Sideload moduna geçin.
  2. TRTools Pro’ta modelinizi seçin.
  3. Extra bölümüne girin.
  4. Sideload Toolkit bölümünden cihaz modelini okuyun. (Benim cihazım V816.0.11)
  5. mifirm veya benzeri bir siteden cihazın hafıza kartı yazılımını indirin. (Cihazınızın mevcut sürümü veya bir üst sürümü tercih edin.)
  6. TRTools’ta Sideload Flasher bölümünden indirdiğiniz ROM’u seçin ve yüklenmesini bekleyin. (Bu işlem biraz uzun sürebilir. Cihaz reset atabilir; bu normaldir.)
  7. Ardından Flash bölümüne gelin ve Eng ROM’u seçin. Firmware Upgrade işaretli olmalı Da dosyasıda Da2 seçili olmalı son olarak countrycode_a seçeneğini kaldırın; aksi hâlde başa dönersiniz.
  8. Flash tuşuna basın ve ses açma/kısma tuşlarına basılı tutun. İşlemin tamamlanmasını bekleyin.

İşlem tamamdır.
sideloadsecenek.pngv816okutmasideload.pngsideloadyazılımsecilihali.pngTrToolsPro-2025-09-24-00-25-33.pngsecim.pngengflash.png9e45c61d-edbd-4e84-b1c1-e953fd96f0b0.jpg


Redmi 14C (Lake - Pond) DA Error Solution. (Tested on HyperOS 1 Devices)


Hello everyone, when we perform a faulty operation on the Redmi 14C, we get a DA error even if we select the correct DA file. I am sharing the solution below, personally tested.​

Before starting, let's take a look at the errors.​


OS 1 DA Error​

14chatada1.png

OS 2 DA Error​

14chatada2.png


Let's Move to the Solution

Follow the steps carefully; otherwise, you will have to start over.

  1. Put the device into Recovery mode, then switch to Sideload mode.
  2. Open TRTools Pro and select your device model.
  3. Enter the Extra section.
  4. From Sideload Toolkit, read the device model. (My device is V816.0.11)
  5. Download the Micro SD firmware for your device from mifirm or similar websites. (Choose the current version of your device or a newer one.)
  6. In TRTools, open the Sideload Flasher section, select the ROM you downloaded, and wait for the installation to finish. (This process may take a while. The device may reboot; this is normal.)
  7. Next, go to the Flash section and choose Eng ROM. Ensure that Firmware Upgrade is selected and DA file is set to DA2. Finally, disable countrycode_a; otherwise, you will have to start from the beginning.
  8. Click Flash and hold the volume up/down buttons. Wait for the process to complete.

The process is complete.
sideloadsecenek.pngv816okutmasideload.pngsideloadyazılımsecilihali.pngTrToolsPro-2025-09-24-00-25-33.pngsecim.pngengflash.png9e45c61d-edbd-4e84-b1c1-e953fd96f0b0.jpg
 
Son düzenleme:

GSMFORUM

Administrator
Yönetici

Redmi 14C / POCO C75 ( Pond ) Nvdata Nvram Backup


Ekli dosyalar

  • Xiaomi-Redmi 14C - POCO C75 - A3 Pro (pond) - (2025-09-26-11-27-59).zip
    1,014.8 KB · Görüntüleme: 199
  • Xiaomi-Redmi 14C - POCO C75 - A3 Pro (pond) - (2025-09-26-11-23-05).zip
    1.9 MB · Görüntüleme: 172

GSMFORUM

Administrator
Yönetici

Redmi 14C / POCO C75 ( Pond - Lake ) NvData Hatası Kalıcı Çözüm


Cihaza ENG ROM’u kesinlikle yükleyin ve cihazı açın.
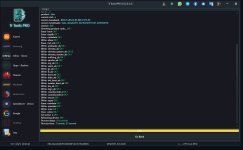
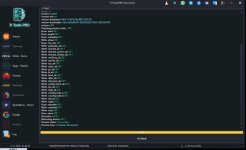
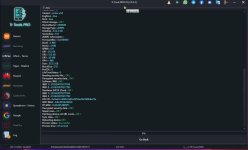
TRTools üzerinden Repair yapın.

Sadece ADB mode+ PATCH BL LOCK seçeceksiniz.
Sonrasında Redmi 14C’nin en güncel sürümünü yükleyeceksiniz.
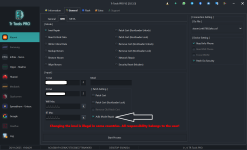
Buradaki kritik uyarıyı iyi okuyun.
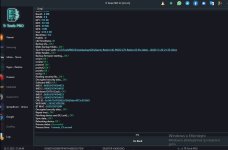
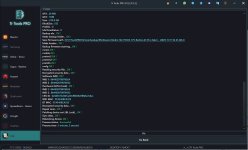
TRTools Fastboot Flasher ile yazılım atarken Opcust ve Opconfig tiklerini MUTLAKA kaldırın.
Bu iki tik açık kalırsa işlem ÇÖPE GİDER, başa dönersiniz.
Ayarlar kısmına asla dokunmayın. Karıştırırsanız sorumluluk size aittir.

Redmi 14C / POCO C75 (Pond - Lake) NvData Error Permanent Solution


You must definitely install the ENG ROM on the device and boot it up.
Perform the Repair process through TRTools.

You will select only ADB mode+PATCH BL LOCK
After that, you will install the latest firmware for the Redmi 14C.

Please read this critical warning carefully.
When flashing the firmware using TRTools Fastboot Flasher, you MUST uncheck the Opcust and Opconfig options.
If these two options remain enabled, the entire process will FAIL and you will have to start over.

Never touch the Settings section. If you change anything and cause an issue, the responsibility is yours.

 
Moderatör tarafında düzenlendi:

Nurulika

Administrator

📱 14C (LAKE–POND) Cihaza UBL Yapmadan Kayıt Yapma Yöntemi


⚙️ 1. ENG Atma İşlemi:
Cihaza ENG atın.
Eğer TR Tools destekliyorsa, TR Tools üzerinden atacaksanız “Firmware Upgrade” seçeneğini işaretleyin.
Country Code tiklerini ❌ kesinlikle kaldırın.

⚠️ DA Hatası alırsanız:
Auth ile ENG atın.
Yine Firmware Upgrade seçeneğini seçin ve Country Code tiklerini kaldırın.


📂 Kullanmanız Gereken ENG Dosyası:
🔗
🔑 RAR Şifresi: masoodmobilesoftware

🧰 2. Kayıt İşlemi:
ENG işlemi tamamlandıktan sonra TR Tools ile ADB modu + PATCH BL LOCK seçin.
Ardından kayıt atın.


🌍 3. Global Yazılım Yükleme:
📦 Benim kullandığım sürüm: 2.0.4 Global ROM
🔗
🧑‍💻 Fastboot’tan yazılımı atarken:
OPCUST ve OPCONFIG tiklerini ❌ kesinlikle kaldırın.
Yükleme tamamlandığında işlem bitmiştir. ✅
1763041599699.png


⚠️ Önemli Uyarı:
🚨 İşlem sırasında telefon çökerse veya JTAG’lık olursa, risk %100 size aittir.
Ben hiçbir sorumluluk kabul etmiyorum.


📱 14C (LAKE–POND) Method to Perform IMEI Repair Without UBL


⚙️ 1. ENG Flashing Process:
Flash the ENG file to the device.
If TR Tools supports the device and you want to flash via TR Tools, select the “Firmware Upgrade” option.
Make sure to ❌ uncheck the Country Code options.

⚠️ If you get a DA Error:
Flash ENG with Auth.
Again, select the Firmware Upgrade option and uncheck the Country Code boxes.


📂 Required ENG File:
🔗

🔑 RAR Password: masoodmobilesoftware

🧰 2. IMEI Registration Process:
After the ENG process is completed, select ADB modu + PATCH BL LOCK in TR Tools.
Then perform the IMEI write.


🌍 3. Flashing the Global ROM:
📦 The version I used: 2.0.4 Global ROM
🔗

🧑‍💻 While flashing the ROM in Fastboot:
Make sure to ❌ uncheck OPCUST and OPCONFIG.
Once the flashing is completed, the process is finished. ✅
1763041599699.png


⚠️ Important Warning:
🚨 If the phone crashes during the process or becomes JTAG-required, the risk is 100% yours.
I do not accept any responsibility.
 
Moderatör tarafında düzenlendi:

GSMFORUM

Administrator
Yönetici

14C (LAKE–POND) Cihaza UBL Yaparak Kayıt Yapma Yöntemi


Bu cihazlar, HyperOS 1.0.9 ve üzeri sürümlerde ENG atarken **DA hatası** verebilir.
Bu durumda işlemi sorunsuz yapabilmek için ya **yetkili ile ENG atmanız** ya da **UBL (Bootloader Kilidi) açtırmanız** gerekmektedir.

Aşağıdaki adımları dikkatlice takip ederseniz hiçbir sorun yaşamadan onarım yapabilirsiniz.

✔ İlk adım: Bootloader kilidini açtırın.


1 - TRTools Pro’dan cihaz modelini seçin

modelsec.png


2 - TRTools Fastboot bölümüne gelin ve sitemizde bulunan ENG ROM’u yükleyin

engsec.png


3 - ENG işlemi tamamlandıktan sonra cihaz açılır.
ADB MODE+ PATCH BL LOCK seçerek IMEI 1 ve IMEI 2 numaralarınızı yazın ve işlemi başlatın


1767713434309.png

4 - İşlem tamamlandığında aşağıdaki gibi bir ekran göreceksiniz

işlembitimi.png


5 - Telefonu Fastboot moduna alın ve sitemizde bulunan STOCK ROM’u indirin.
⚠ Çok Önemli: Fotoğrafta görünen "OPCUST", "OPCONFIG" ve "Country" seçeneklerini mutlaka kaldırın!


lakestockrom.png


6 - İşlem tamamlanana kadar bekleyin.
Geçmiş olsun!


fashbootflashok.png


14C (LAKE–POND) IMEI Repair Method Using UBL (Bootloader Unlock)


These models may give a **DA Error** on HyperOS 1.0.9 and above when flashing ENG ROM.
To complete the repair successfully, you must either **flash ENG with authorization** or **unlock the bootloader (UBL)**.

If you follow the steps carefully, the process will be completed without any issues.

✔ Step 1: Unlock the Bootloader first.


1 - Select the device model in TRTools Pro

modelsec.png


2 - Go to TRTools Fastboot section and flash the ENG ROM from our website

engsec.png


3 - After the ENG process is complete, the device will power on.Select ADB MODE + PATCH BL LOCK, enter your IMEI 1 and IMEI 2 numbers, and start the process.

1767713463469.png


4 - At the end of the process, you will see the following screen


işlembitimi.png


5 - Put the phone into Fastboot mode again and download the STOCK ROM from our website.
⚠ Very Important: Uncheck the "OPCUST", "OPCONFIG", and "Country" options!


lakestockrom.png


6 - Wait for the flashing to complete.
Process finished successfully!


fashbootflashok.png


Ekli dosyalar

  • imeiekranı.png
    imeiekranı.png
    164.2 KB · Görüntüleme: 665
Moderatör tarafında düzenlendi:

mklgltkn

Administrator
14c Lake sorunsuz işlem için Tr Tools Pro ✅

Os1 ise direkt Tr Tools Pro eng atıyor os2 ise yetkili hesap gerekiyor yetkili hesap ve uzaktan bağlantı işlemleriniz için whatsapp: 0553 659 0144
 

Ekli dosyalar

  • 4742e331-58e5-4f70-af1c-7316585c8ed7.jpeg
    4742e331-58e5-4f70-af1c-7316585c8ed7.jpeg
    169.3 KB · Görüntüleme: 80
  • a8ce837e-1d92-4550-8825-66ff39cfa995.jpeg
    a8ce837e-1d92-4550-8825-66ff39cfa995.jpeg
    121.3 KB · Görüntüleme: 71
  • 89790f54-3f01-439e-a2b5-60ac555bf019.jpeg
    89790f54-3f01-439e-a2b5-60ac555bf019.jpeg
    73.3 KB · Görüntüleme: 68
  • e0c553f8-a22e-486e-8b97-7225688d7bc2.jpeg
    e0c553f8-a22e-486e-8b97-7225688d7bc2.jpeg
    118.7 KB · Görüntüleme: 69
  • 602e9021-b99e-4524-a3f6-d0f9d7c72a13.jpeg
    602e9021-b99e-4524-a3f6-d0f9d7c72a13.jpeg
    361.8 KB · Görüntüleme: 67
  • 451e6f2e-b784-495f-98cd-e7358fedbfd5.jpeg
    451e6f2e-b784-495f-98cd-e7358fedbfd5.jpeg
    114.1 KB · Görüntüleme: 64
  • 505f2d08-c89b-4f32-b879-c6eb47aaf9f4.jpeg
    505f2d08-c89b-4f32-b879-c6eb47aaf9f4.jpeg
    125.4 KB · Görüntüleme: 59
  • 53ec75fe-9805-4c90-8f77-b08f01d1d024.jpeg
    53ec75fe-9805-4c90-8f77-b08f01d1d024.jpeg
    107.6 KB · Görüntüleme: 56
  • 3f888419-96da-4730-b110-d4eb61b634c1.jpeg
    3f888419-96da-4730-b110-d4eb61b634c1.jpeg
    74.1 KB · Görüntüleme: 55
  • 15d8b8fe-9ab1-4084-af24-0e687ed32b86.jpeg
    15d8b8fe-9ab1-4084-af24-0e687ed32b86.jpeg
    276.7 KB · Görüntüleme: 67

mklgltkn

Administrator
❗ DİKKAT ÖNEMLİ ❗

yeni güncelleme ile country tiklerini ve diğer tikleri sakın kaldırmayın tr tools pro v2 otomatik ayarlıyor tik kaldırırsanız cihaz brom modda takılı kalır
 
Durum
Üzgünüz bu konu cevaplar için kapatılmıştır...
Üst